Sunday, December 3, 2017

Lab 8: Web-Based database manipulation (part 2)

Objectives:
  • Learn how to delete a data from database using PHP 
  • Learn how to update a data in database through PHP and HTML form.
  • Learn the use of different input elements in HTML form.
Instructions:
  1. Download Lab 8 and codes from links.
  2. Follows the instruction of Lab demo and tries all the codes in the lab.
* Slides and codes are updated on 4th Dec 2017, courtesy of Mr Kuan Huiggy.

Sunday, November 26, 2017

Lab 7: Web-based Database Manipulation

Objectives:
  1. Connect MySQL using PHP.
  2. Retrieve and display data from MySQL using PHP and HTML.
  3. Input Data to MySQL using PHP and HTML form.
Instructions:
  1. This lab is based-on the students table from the previous lab.
  2. Download the slides from the link(updated).
  3. Perform all the exercises in the slides
* The previous slides have some issue on the database connection slides. Please update your slide to the latest one.
*Slides 23 updated on 28 Nov 2017, the method for the form is changed from "post" to "get". This will overcome the error for later lab exercise. 

Saturday, November 18, 2017

Lab 6

Since some lab have completed Lab 5. This week lab will be on preparation for next week.

Objectives:
  • Explore the use of GUI Web-based Database Management System (PHPMyAdmin).
  • Explore The WebPage Scripting (HTML).
  • Explore The fundamental of PHP Scripting.
Instructions:
  1. Access the PHPMyAdmin module in your XAMPP through http://localhost/phpmyadmin 
    • explore and see how the database in previous lab looks like in PHPMyAdmin.
    • Explore the structure tab and SQL tab.
    • Try some SQL statements using the SQL module.
  2. Explore HTML scripts in building simple webpages from links.
  3. Explore PHP scripts for database management. explore it at links.
* the slides for this lab is downloadable through link. The slides are provided by Mr Kuan Huiggy.

Saturday, November 11, 2017

Lab 5

Objectives:
  • Retrieves data from two tables using:
    • Select Query
    • JOINS
      • INNER JOIN
      • LEFT JOIN
      • RIGHT JOIN
      • FULL JOIN
    • UNION
  • Retrieve Data from Table by groups
  • Using LIKE keyword and WILDCARD Operator to search database content
Instructions:
  • Download the lab slides from links.
  • Update the database content based on the code and data in slide 4 and slide 5.
  • Execute all the SQL statements in Lab Exercise section and documents the results.
  • Screenshot all the operation exercise above and save it in a Microsoft Documents named "lab5-[matric no]". *each lab document will be different because your matric number is included in your table name. For example: 56788_students for student with matric number 56788.
    • Group 06/07 are required to submit in eleap after the lab sessions by 30 Nov 2017.
    • The other group depends on your lecturer’s instruction.

Thursday, November 2, 2017

Lab 4: Functions in SQL part 1

Objectives:
Instructions:
  • This labs uses the students table with the data shown in Figure 1 below:
Figure 1: Table Students.
  • Update the information in Figure 1 into your students table using the SQL command you learnt previously.
  • Follow the instructions from the links in the lab objectives to understands the different functions in SQL commands.
  • Perform the operation below:
    • Retrieve the distinct list of intake year from the table students.
    • Sort the distinct list of intake year from the table in descending order.
    • retrieve a data from table students where the name of the student is Enson Liu and the year of intake is 2016.
    • Retrieve the data from table students where the name of the student is Enson Liu or the the year of intake is 2012.
    • List all the student in table students that are not from the year 2018.
    • Calculate the sum and average value for the student id in the table students.
    • show the largest year in the table students.
    • Show the smallest student id in the table students.
  • Screenshot all the operation exercise above and save it in a Microsoft Documents named "lab4-[matric no]". *each lab document will be different because your matric number is included in your table name. For example: 56788_students for student with matric number 56788.

Using MAX and MIN Functions

Beside Average, Count and Sum functions, SQL statement also have MIN and MAX functions.
MIN function returns the data with the minimum value in a column. This to obtain the minimum value in a column is:
Figure 1 below shows how the above SQL statement is used to obtain the smallest year number in the table students.
Figure 1: Output the minimum year number from table students using the SQL MIN function.
MIN Function outputted the minimum value in the column, Then MAX function will output the maximum value from the particular column for SQL statement. The syntax for MAX function in SQL statement is:
Figure 2 below shows the SQL statement obtain the largest (Maximum value) student ID in the table students using MAX function.
Figure 2: Output the largest (Maximum Value) student ID in table students

Thursday, October 26, 2017

Function COUNT, SUM and AVG

MySQL have some predefined functions, which can be called using SQL statements. This are some basic mathematical functions such as COUNT, SUM, AVG, MAX and MIN functions.

Function COUNT

COUNT function returned the total number of data retrieved by a given SQL statement. The syntax to count the data is:
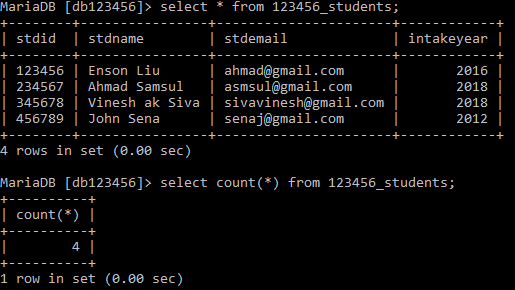
The example of the SQL statement is shown in Figure 1:
Figure 1: Using COUNT() to calculate the number of data in table "students".
In Figure 1, the first SQL statement shows the all the data in the table students, while the second statement shows output of COUNT(*) functions, which is the total number of data in the table.

Function SUM

SUM is a summation function, which is a mathematical formula to add all the value together. In SQL statement. The syntax to perform SUM function for a column is:

The SUM function can only perform for numerical column. Column that is text or varchar cannot perform such function. Figure 2 shows database administrator sum the intake years for the students table.
Figure 2: Summation for intake year in students table.
When user attempts to sum the value of a column that consists varchar or text, the SQL statements will returns value "0" and warnings for each of the data containing none numerical data. Figure 3 below shows the attempts of summing column that content none-numerical value.
Figure 3: Output for Summing none numerical data in MySQL / Maria DB.

Function AVG

AVG is the acronyms for "AVERAGE". The AVG function is used to calculate the average value for each of the value in the column. The operation add all numerical data from the column and divide by the number of data to output the average value for a particular column in the table. Figure 4 below shows the SQL statements to calculate the average intake year for the students in the table students.
Figure 4: Calculating average year for each student in table students.
Similar with summation function, the AVG function cannot process none-numerical data in the column. If there exist one or many none-numerical data in the column, the SQL statement will skip these column and only sum the column with numerical data. However, the AVG function still divide the summed value with the total row of data available.

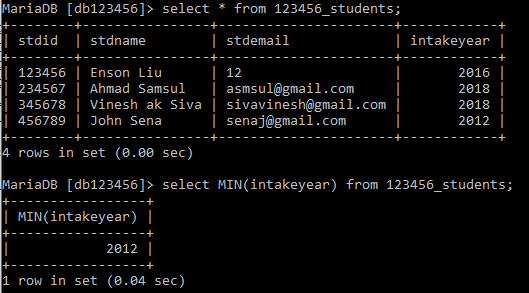
In Figure 5 below, the student email for student with stdid "123456" is changed to value 12. After that the database administrator attempts to calculate the average value for the column "stdemail". The results show value "3", which is the value of "12" divided by 4 column of data.
Figure 5: Performing AVG function with none-numerical column.

Friday, October 20, 2017

Excluding data value in filtering

NOT operator is used to exclude certain value from the retrieved data. This operator is in syntax as below:
The example of how the operator can be used is shown in Figure 1 below:
Figure 1: Select data from student table where intake year is not 2018

Retrieve, update and delete data from table with multiple conditions.

In Lab 2, we learnt to use WHERE clause to specify which data to retrieve, update or delete. This is usually done through the use of primary key. However, sometimes database administrator or user need to perform to some data in the table based on several criteria. The keyword AND and OR is used so that the WHERE clause filtering can be done with multiple conditions.

The AND operator displays a record if all the conditions separated by AND is TRUE. Figure 1 shows the example of using AND to retrieve data that matches two condition given. 
Figure 1: SQL statements with AND keyword in WHERE clause.
Noticed in the first SQL statement returned a data where both of the condition in the WHERE clause are met. (stdname = "Enson Liu" AND intakeyear = 2018). While the second SQL statement return zero data because only one of the condition are true.

The OR operator displays a record if any of the conditions separated by OR is TRUE. Figure 2 shows the example using OR to retrieve data with either one or both condition is matches.
Figure 2: SQL statements with OR Keyword in WHERE clauses.
Noted the first SQL statement return directly the data regarding Enson because both of the condition matches. Second SQL statements returned the data for Enson Liu and also John Sena because the data for "Enson Liu" is TRUE for the first condition, even though the second condition is wrong, the statement still return TRUE. For the data of John Sena, the first condition is FALSE, but the second condition is TRUE. Therefore under the OR selection, the data for John Sena is still TRUE for the SQL statement.

The third SQL statements did not return any data because there are no data in the table that matches neither one of the condition given.

The use of OR and AND is applicable for all the WHERE clauses in SQL statements, includes UPDATE and DELETE statements.

Tuesday, October 17, 2017

Sorting Retrieved Data from Table

The data retrieved from a selected table is based on the sequence of the data entered into the table. Therefore, the data may not be in any order based on the context. Figure 1 below shows the retrieval of data from the table students.
Figure 1: Table students
Noted that the data is not sorted by name or by year of intake and only based on the primary key (stdid). Database administrator or user can choose to order the data based on the column desired. The syntax to perform the operation is:
Database administrator or user can choose which column to sort and also how to sort the data. ASC is the keyword to sort the data in an ascending order (small to big), while DESC is the keyword to sort the data in a descending order. The example of sorting using ASC keyword is shown in Figure 2, while the example of sorting data using DESC keyword is shown in Figure 3.
Figure 2: Sorting the data from students table based on column stdname in ascending order.
Figure 3: Sorting the data from students table based on column stdname in descending order.

Retrieve Distinct Data from Table

Data can be retrieved from table using SELECT [COLUMN] FROM [TABLE]. Sometime, the statement can retrieve multiple data that are the same. Figure 1 below shows the example of the duplication data in a SELECT statements.
Figure 1: Retrieve year of intake from table students.
Noted in Figure 1, where the SQL statement returned 2 2018 figures in the result. This happen because there are two data with the same intake year in the table. SQL had a pre-defined function to remove duplicate data in a column. The SQL syntax is shown below:
The keyword DISTINCT will allow the SQL command to display a set of unique data only in a column. The example of using the particular command is shown in Figure 2 below:

Friday, October 13, 2017

Update Data in Table using SQL

Beside insert and display data from table, database administrator can edit the information in a table using SQL statement. The syntax to update an information in a table is:
The Figure 1 below show the command updating the information in the "students" table.
Figure 1: Using SQL to update the student email and yea of intake using SQL statements
One thing need to be careful is to set the WHERE clause for the UPDATE statement. Same like SELECT statements, WHERE clause is used to identify the specific data in the table to perform the operation. Usually the condition for UPDATE statements in the WHERE clause is based on PRIMARY KEY. 

However, if WHERE clause is not define, the SQL will change all the data in the table. The result of such mistake is shown in Figure 2 below:
Figure 2: Result of UPDATE statements without WHERE clause
Notice in Figure 2 where all the stdemail changed into "ahmad@gmail.com", this is the result where no particular reference point is provided for the SQL to update the information. Therefore, the the statements update all the data in the column as defined by the SQL statement.

Beside update one particular data in the table using UPDATE statement with WHERE clause, database administrator can also update a set of data that through defining the correct WHERE statement. For example, updating all the intakeyear from 2017 to 2018. The operation is shown in Figure 3 below.
Figure 3: Update a set of data using SELECT and WHERE clause.

Lab 3: Insert, Retrieve and Delete data from Database using SQL

Objectives:
after this lab, students are able to

Instructions:
  • follow the instructions from the links in the objectives. after that, complete the exercise below:
    1. insert three (3) data to each of the table in the tables created in lab 2. 
      • Fill in the lecturer table using the details of your favorite lecturers.
      • Fill in the course table using the details of your favorite courses.
      • Fill in the students table using your own details and two of your course mates beside you in the lab.
      • Fill in the appropriate information in the enrollment table using your data and your course mates data.
    2. Select and display all the data in table course.
    3. Select and display your own data from students table using your student ID.
    4. Update your own year of intake in the students table to 2010.
    5. delete one lecturer from your lecturer table.
    6. delete all lecturers from your lecturer table.
*Use snipping tools (in windows) or screencapture software to print screen the show database result before and after the task. Save the task title and also the screencapture in a Microsoft Document named "lab3-[matric no]".

Delete Data from Table

Delete data from database is one crucial task for database administrator. Unlike removing a table or a database, delete data from table uses the DELETE statements.

The syntax to delete data from table is:
Figure 1 below shows the deletion of data from table "students":
Figure 1: Delete the data for "Ahmad Samsul" from table "students" using the student ID.
It is crucial for the database administrator to make sure the WHERE clause is stated in the SQL command when data from a table. This is because when user executing the SQL command without the WHERE clause, the database will act to delete all the data in the selected table. The Figure 2 below shows the results when the WHERE clause is missing when executing the SQL statements.
Figure 2: Executing DELETE statements without WHERE clause.
Selecting the correct condition is also important in performing delete operation in database. Usually the deletion of a particular data from table is based on primary key, this is because the primary key is the key reference point for a data.

However, sometimes user can delete a set of data from the table by using certain column in WHERE clause. Figure 3 shows how user to delete a set of data that share the same data (same intake year) from the table "students".
Figure 3: Delete a set of data based on the same "intakeyear" column.
* Lab demo, please show the class how to insert the extra data into the table, or re-enter the data into the table to demo the different DELETE statements. Use Insert Page as reference.

Thursday, October 12, 2017

Select and Display data from Table using SQL

Database administrator can query and display data from table directly using SQL statements. The most basic SQL query to retrieve and display information from table on to computer screen is the SELECT statements. This lab will use the tables created in Lab 2 and the insert table steps to demonstrates the use of SELECT query.

SELECT Data from Table
Select and display all data can be done by using the following syntax:
The example in Figure 1 below shows how the SQL statement is used to retrieve and display the data in table "students".
Figure 1: Retrieve and display all data from table "students"

SELECT Data a set of Column in Table
User can choose to select and display a particular set column of data to be shown to the screen. The operation can be done using the SQL syntax below.
The example in Figure 2 below shows how the SQL statement is used to select and display only the student name column and the year of intake column in the table "students".
Figure 2: Select and display only 2 column from table "students".
WHERE clause in SELECT Statements:
Specifying the column name in the SELECT statements can help to filter out the unwanted column in the data retrieve and display. How about filtering the data in row? The WHERE clause is use together with SELECT statements to filter out specific information in the database to be shown to the user. the syntax of WHERE in SELECT statements is shown below:
Figure 3 below shows how to select the data for a student called "Enson Liu" from the table "students":
Figure 3: Select data for student called "Enson Liu".
Notice in Figure 3, where the result only display the data for student named "Enson Liu", while the select statement in Figure 1 shows data for 2 students.

Insert Data to a table using SQL command

Database administrator can input data into database table using SQL statements. In this lab, we will be using the tables created in the previous lab (Lab 2) as example in showing the insert data. The tables created previously is shown in Figure 1 below.
Figure 1: Show tables in the previous lab exercise.
The SQL command to insert a data into a particular table is shown below:

Figure 2 shows how to insert the data shown in the table below into the table "123456_lecturer".
Table 1: Data for lecturer "Ms. Inson Din".

Figure 2: Syntax to insert data from table 1
Using the similar SQL command, a user can choose to enter partial data into a particular table. Figure 3 shows the metadata of table "students".
Figure 3: metadeta of table "students".
However, the insert operation shown in Figure 4 below shows that only 3 column of data were entered into the system without the column "stdemail".
Figure 4: Insert data into tables with data from specific column only.
This operation to only fill partial columns in a data can be achieved by only selecting the specific column to be entered in the first line of the SQL statements, and only fill in the column accordingly in the second SQL line.

Thursday, October 5, 2017

Lab 2 : Manipulating Database Table Structure using SQL

Objectives:

Instructions:
Figure 1: ERD Course Management System

  • Go follow the instructions and walk through from the links in the objectives. After that complete the exercise below:
    1. Create a database using MySQL/MariaDB console with your Matric No as database name.
    2. Based on the Entity Relationship Diagram (ERD) in Figure 1. Create all the tables in the ERD with your Matric No as prefix for each table. For example, if your Matric no is "123456", then the table name for table Lecturer should be "123456_Lecturer".
    3. Add a column called "Department" with datatype "VARCHAR(12)" to the table "Lecturer". Shows the metadata of the updated "Lecturer" table.
    4. Drop the "Department" column from the table "Lecturer", and show the metadata of the updated "Lecturer" table.
*Use snipping tools (in windows) or screencapture software to print screen the show database result before and after the task. Save the task title and also the screencapture in a Microsoft Document named "lab2-[matric no]".

Delete a Table

There are 2 operation to delete a table.

  • Delete the whole table structure from database.
Delete the whole table from database means removing both the data and table structure from the database. the SQL command to perform the operation in MySQL/MariaDB is as below:
The example of the SQL command in action is shown in Figure 1 below:
Figure 1: Delete table in database
*This action will remove the table from your database. Do not do this unless you are absolutely sure that you want to delete the table.
  • Delete all data in the table.
Beside deleting the whole table, the database administrator can choose only to empty the content of the table. The SQL command to empty a table in MySQL/MariaDB is:
The example of the SQL command in shown in the Figure 2 below:
Figure 2: 
*This action will remove all the data from your table in the database. Do not do this unless you are absolutely sure that you want to empty the table.

Alter table column


Sometimes, the table structures need to change due to certain reasons. SQL command allows the table structure to be change. The basic operation can be done to change the structure of a tables are:

  • Add a new column:
Adding a new column into a table can be done through the following command syntax:
The example of the command in action is shown in Figure 1 below, where a new column "data" with datatype "text" is added into the table "students_with_pk" created previously:
Figure 1: Add table column
  • Remove a column
Removing a column from a table can be done through the following command syntax:
The example of the command in action is shown in Figure 2 below, where a column "data" is removed from the table "students_with_pk":
Figure 2: Remove column "Data" from Table 
  • Changing the datatype in a column
The DBMS also allows database administrator to edit the datatype of a column using the SQL command:
The example of the command in action is shown in Figure 3 below, where the datatype for column "stdemail" is changed from "text" to "varchar(155)":
Figure 3: Modifying the datatype is a column.
  • Removing a primary key from a table
Database administrator can add or remove a primary key from a table. Although this seldom happen, but sometime it is needed due to certain circumstances. Removing a primary key can be problematic as it may jeopardize other tables which uses the primary key as foreign key. The SQL command to remove a primary key for MySQL/MariaDB is:

The example of the command in action is shown in Figure 4 below:
Figure 4: Drop primary key from table
  • Add a primary key to a table

Beside removing a primary key, we can also add primary key in the table. the SQL command for MySQL to add a primary key is:
The example of the command in action is shown in Figure 5 below:
Figure 5: Add primary key to a table.
A primary key of a table can be a combination of multiple key. Therefore an administrator can add a primary key with multiple keys using the SQL commands below:
The sample of the command in action is in Figure 6 below:

* this code is optional to demonstrate, if want to demonstrate, please perform a drop primary key action first before demo.